Dev Blog:Modern front-end development in OpenCms with Vite

Vite brings a modern, efficient development experience to OpenCms. Updates appear in real time for (S)CSS and JavaScript, reducing complexity and keeping the creative flow uninterrupted. With its lightweight setup and powerful live-reload capabilities, Vite redefines how front-end work is done in OpenCms. The result: less waiting, more creativity, and a more efficient way to customize the Mercury Template.
In the following article, we’ll walk through how to set up OpenCms and the Mercury Template for development with Vite. You’ll learn how to configure your project, connect it to the OpenCms workspace, and begin developing with instant feedback and modern front-end tooling. Once configured, you can enjoy a smooth, modern workflow that combines the power of OpenCms with the speed of today’s front-end ecosystem.
What is Vite?
Vite is a modern front-end build tool and development server designed to make web development faster and more efficient. Vite takes advantage of native ES modules in the browser to serve source files directly during development.
This means that changes are reflected in real time through Hot Module Replacement (HMR) without a full page reload. For more information about Vite, please visit the project website.
Prepare your environment for using Vite
Checkout the Mercury template project
The Mercury template repository can be downloaded or checked out from GitHub. In order to use Vite for local development, you have to checkout the Mercury project to your local file system. To do so, open a terminal window and change to your development folder where the Mercury template project should be checked out to. Clone the repository by using the following command:
git clone https://github.com/alkacon/mercury-template.git
After that, switch to the project folder by typing:
cd mercury-template
Now you have checked out the master branch of the Mercury template. If you want to start developing in your own branch like "myproject" starting from a specific tag version, e.g. Mercury version 20, enter the following command:
git checkout -b myproject tags/build_20_0_0
This creates a new working branch named "myproject". You have now checked out the Mercury template and can start setting up your project.
Install project dependencies
In order to be able to generate the minified CSS and JavaScript files for the Mercury template, you have to install all necessary project dependencies. Use again a terminal window and navigate to your Mercury template project folder ("mercury-template"). Enter the following command:
npm install
This installs the project dependencies specified in the package.json file and may take a while. Before continuing, please ensure that there are no errors thrown during the installation.
Conventional deployment
After installing the necessary dependencies, your system is ready to launch the conventional building processes by using
npm run css
to trigger the build after each change to CSS or JavaScript files. With Vite configured as shown below, long waiting times for the build and manual reload of the preview page in the browser will not be needed any more.
Create a local Vite environment config file
In the Mercury template project folder ("mercury-template"), create a new file with the exact file name "vite.env.js". This file is needed to configure the local environment for Vite. Paste the following contents in the new file:
let server = 'https://ocms-workplace-server-url';
let site = '/sites/default/';
let workspace = '/path/to/workspace/folder';
let secret = 'mysecret';

module.exports = {
    OPENCMS_SERVER: server,
    OPENCMS_SITE: site,
    OPENCMS_WORKSPACE: workspace,
    OPENCMS_VITE_PREFIX: ['/template-src/', '/node_modules/'],
    OPENCMS_VITE_SECRET: secret,
    OPENCMS_VITE_REPLACE_CUSTOM: true,
    OPENCMS_MERCURY_SCSS: '/scss/themes/'
};
You have to adjust the values of the following variables in the first 4 lines of the configuration to match to your development environment:
- server: Enter here the URL to your OpenCms workplace server, e.g. "http://localhost:8080".
- site: The root path of the OpenCms site to work with has to be entered here, e.g. "/sites/default/" for the Mercury default demo site.
- workspace: Specify the absolute path to the workplace folder containing the "mercury-template" project folder, without trailing "/".
- secret: The string entered here is used to prevent misuse and ensures that only an OpenCms user that has the same secret string configured is able to use Vite for development. This configuration is done in the next step.
Set the Vite secret for an OpenCms user

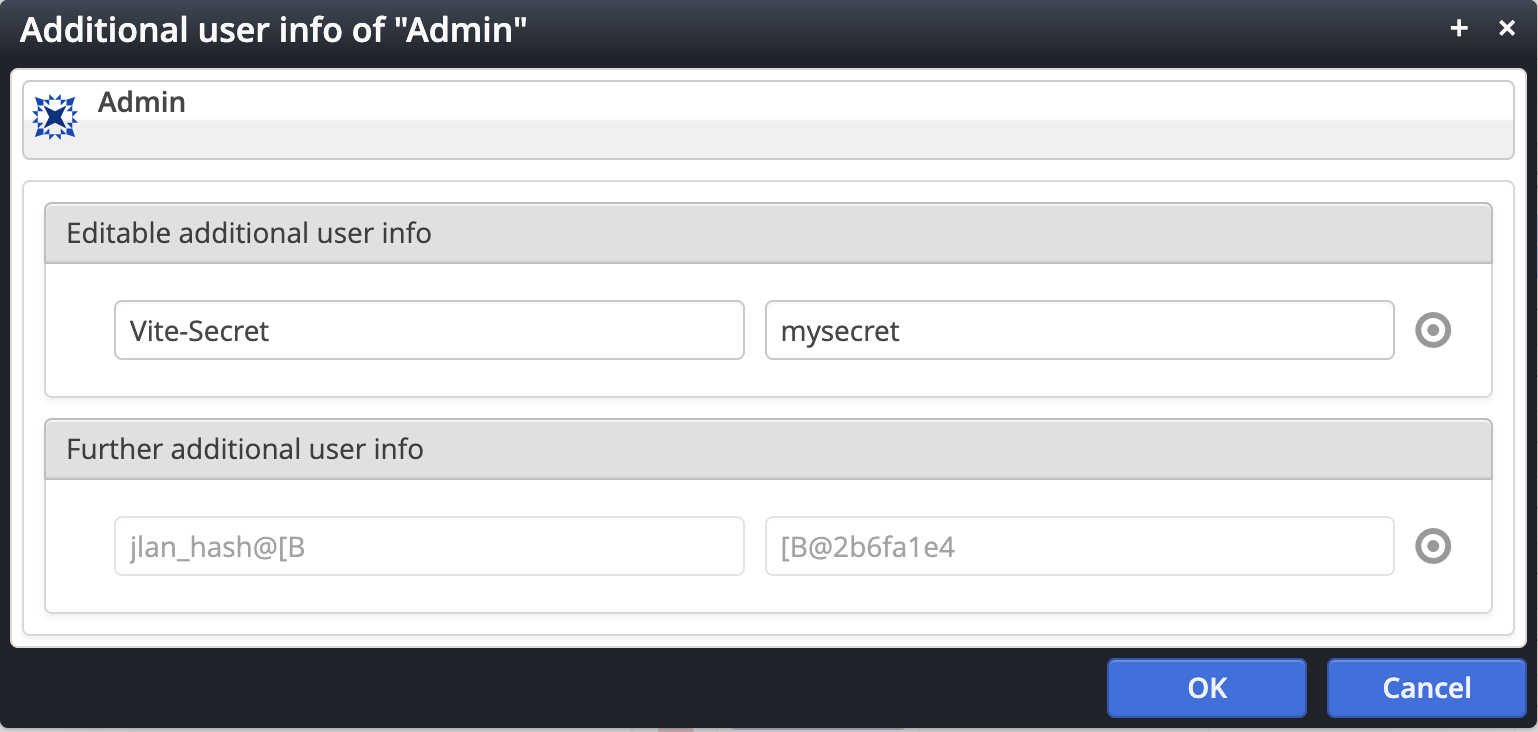
To be able to use the Vite environment with a specific OpenCms user, this user has to provide the same secret String that is configured in the environment config file. To do so, you have to login to OpenCms as a user with "Root administrator" role, e.g. "Admin".
- Switch to the Launchpad and click on "Accounts".
- Click "Users" and locate the user you want to be able to work with Vite.
- Right click on the user name to open the context menu and select "Additional infos".
- In the dialog, either click the "Add" button or the "+" icon on the right side of an existing editable addional user info while hovering the "target" icon.
- In the new line, enter "Vite-Secret" as the key for the new entry and your secret string from the configuration file as value.
- Click "OK" to save the changes.
Launch the Vite proxy
In your terminal window, launch the Vite proxy in your "mercury-template" project folder using the following command:
npm run vite-proxy
You should see an output containing the server URL of the Vite proxy, usually "http://localhost:8099".
Working with Vite
Login to OpenCms and work with Vite

Point your browser to the URL of the Vite proxy, followed by the OpenCms login path, usually "http://localhost:8099/system/login". Login to OpenCms with the user that has the Vite secret configured and switch to the site you configured in the Vite environment configuration.
Open a page in the page editor. The "User info" icon in the top right corner should now have a yellow overlay that provides additional information when hovering it. This indicates that the Vite development mode is currently active for this page.
Check if the Vite development works

If you followed the instructions and configured the Mercury default demo as Vite site, you can edit the file "template-src/scss/themes/theme-standard.scss" to check if Vite works correctly.
- Find the line "$main-theme: #b31b34 !default; // dark red".
- Change the color value "#b31b34" to another value, e.g. "#900090" (purple).
- Save your changes.
The page preview should now be rendered using the changed main theme color, e.g. in the main navigation, the link text colors or button backgrounds. Now you are ready to develop your custom styles for Mercury.
Optional: activate JavaScript development for Mercury

If you also want to manipulate or extend the Mercury JavaScript with Vite, the local environment configuration for Vite has to be enhanced with the path to the main Mercury JavaScript file.
- mercuryjs: the path to the main Mercury JavaScript file. Here an alias @mercury-js is used to prevent displaying the full JS path in the Vite development overlay.
- aliasadditions: here the real path to the Mercury JS file is defined as an alias.
The additional lines are printed in bold in the extended configuration below.
let server = 'https://ocms-workplace-server-url';
let site= '/sites/default/';
let workspace = '/path/to/workspace/folder';
let mercuryjs = '/@mercury-js/mercury.js';
let aliasadditions = [{
    find: '/@mercury-js/',
    replacement: `${workspace}/mercury-template/template-src/js/`
}];
let secret = 'mysecret';

module.exports = {
    OPENCMS_SERVER: server,
    OPENCMS_SITE: site,
    OPENCMS_WORKSPACE: workspace,
    OPENCMS_VITE_PREFIX: ['/template-src/', '/node_modules/'],
    OPENCMS_VITE_SECRET: secret,
    OPENCMS_VITE_REPLACE_CUSTOM: true,
    OPENCMS_VITE_ALIASES: aliasadditions,
    OPENCMS_MERCURY_JS: mercuryjs,
    OPENCMS_MERCURY_SCSS: '/scss/themes/'
};
After the modification, you have to restart the Vite proxy in order to use the changed configuration.
Conclusion
Congratulations, you can now use Vite to develop CSS and JavaScript for Mercury.
Please note: after finishing development, you still have to recompile the minified CSS/JS files with the commands
npm run css
npm run js
in order to deploy your changes permanently to Mercury on your OpeCms development server.